
 Scopique
For us novice-to-intermediate-level streamers and video recordists, nothing is worse than being told during the stream that our audio sucks. Even worse is when we have recorded our gameplay only to find out that the game audio was too silent or was loud enough to drown out the voice-over, or vice-versa. Sometimes we end up talking for 15 minutes and no one can hear us over the game audio, or maybe we can’t find that happy medium between cut-scene dialog and our own snappy commentary.
My audio issues started because I have the kind of deep voice that doesn’t lend itself to traveling very far unless I put some *oomph* into it, which I didn’t want to do lest it seems like I’m shouting at the viewers. So to try and boost my voice when making videos I added a gain filter to my mic input in OBS hoping to increase the volume, but that was only the beginning of my plunge into the world of video audio. By the time I was done messing with settings, I was very pleased with the outcome, and figured that this could be information that other new-to-intermediate creators might also find useful.
Note: This post was originally written a few years back. Since then, I lost the original post, OBS has changed their UI and some features, and I have spent more time and effort (and a wee bit of money) on alternative solutions that work just as well as the points discussed below which, unsurprisingly, still hold up today.
Before We Begin
There’s an important step to consider when trying to get your audio correct: listening to yourself. I know, no one likes to listen to themselves talk, but it’s really important that you suck it up and set up monitoring.
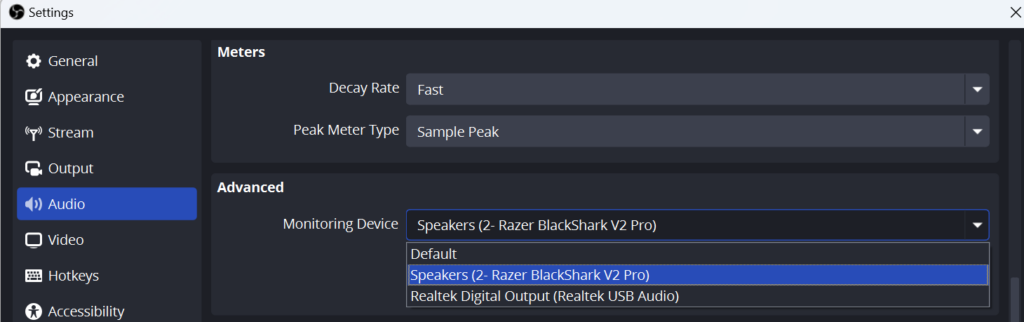
First, you’ll need to open your application audio settings by using the File > Settings menu and selecting the Audio tab on the left. Scroll down a bit and you’ll see the “Audio Monitoring Device”. This is what you’ll use to listen to yourself. “Default” is probably your desktop speakers, but if you have another output device that you can plug headphones into (or if you have a Bluetooth headset or earbuds you can use), select it here. Also, make sure the “Disable Windows audio ducking” box is unchecked.

One more setting before we start. On your input meters there’s a gear icon on the lower left which is really useful for advanced audio tricks, but here we want to open it and select Audio Monitoring for all of your inputs. Change each one to Monitor Only or Monitor and Output depending on how you want to conduct your test.

Note: depending on which device you have as “Default”, you might end up with a lot of audio through one output and not realize that any modifications are taking effect. I advise you to use the local recording option of OBS to record a local video if you don’t want to use live audio monitoring. It’s slower and more cumbersome, but it’s also truer to what your viewers will see than what you’re likely to get using the audio monitoring option. Alternatively, you can fire up a live stream if you have viewers who are accommodating and have someone on the outside willing to help you test your settings.
FYI, live audio monitoring is really disorienting. Make sure you turn this off before your next broadcast, or you’ll sound drunk.
Being Heard
Gain on the mic is important if your voice isn’t very loud. No one should be forced to stream with a mic up their nose, so adding a gain filter to your mic input is a good way to boost the output by boosting the mic sensitivity. Naturally, if you have an advanced mic (i.e. not what came with your headset), there may be a way to set the mic’s gain that you should play with before you add software layers, but if that still doesn’t do it for you, here’s what you need to do:
First, find your audio meters. What we want to do is touch the three-dot menu button the Mic/Aux meter, on the left. From the popup menu, choose Filters.
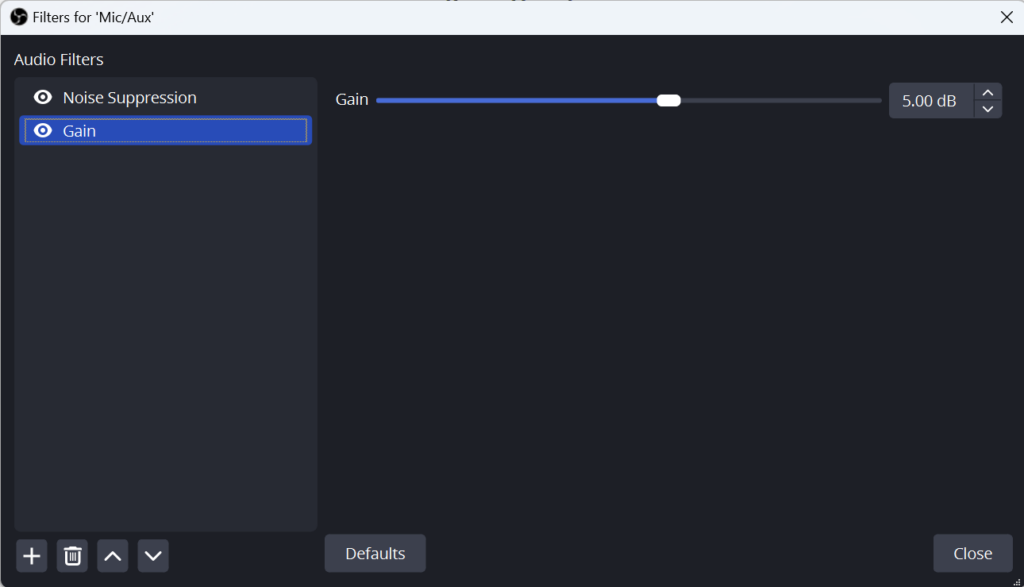
We add filters by clicking on the + icon on the bottom-left. This will give us a lot of choices (not depicted), but Gain is the first one in the list. Adding it will allow you to specify how much of that *oomph* you want to add on top of your input. Positive values means that the mic will pick up more noise, and negative values mean that you will have to shout to be heard. Save that and test by talking at normal volume, louder, quieter, and move around in your chair to ensure that the mic can hear you wherever you expect your head to wander during the stream (super important for non-headset mics with directional pickups).
Naturally, once the mic is more “sensitive” it might start picking up background noise. Being in the basement, viewers might often hear the sound of my HVAC system kicking in, or in your case you might have outside traffic sounds or family members wandering around. To combat this garbage noise, we need to add another filter, the Noise Suppression.
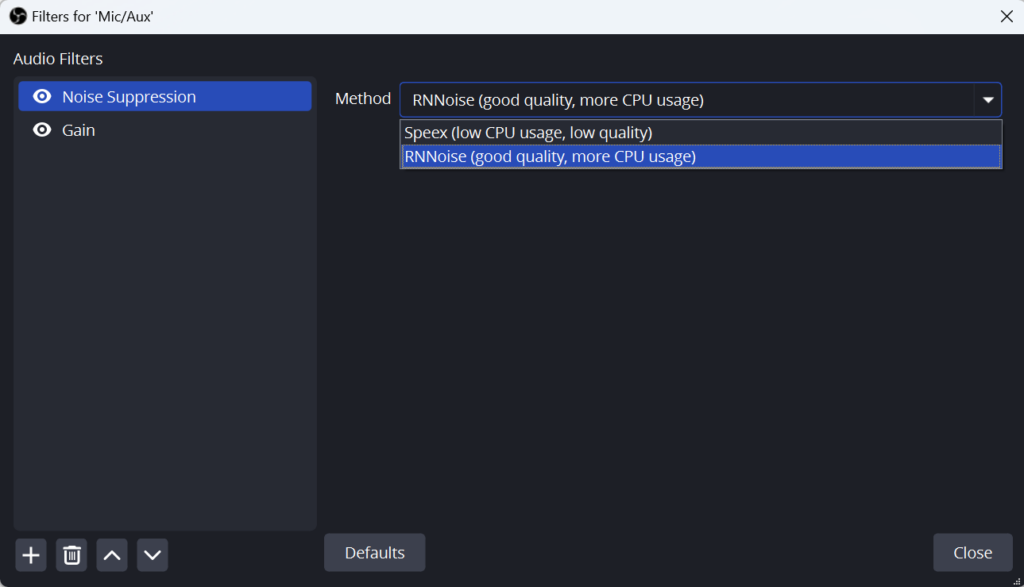
There’s only two options in the noise suppression filter: Speex and RNNoise. Choose whichever one your system can handle when streaming ore recording. I use RNNoise and the results are excellent.
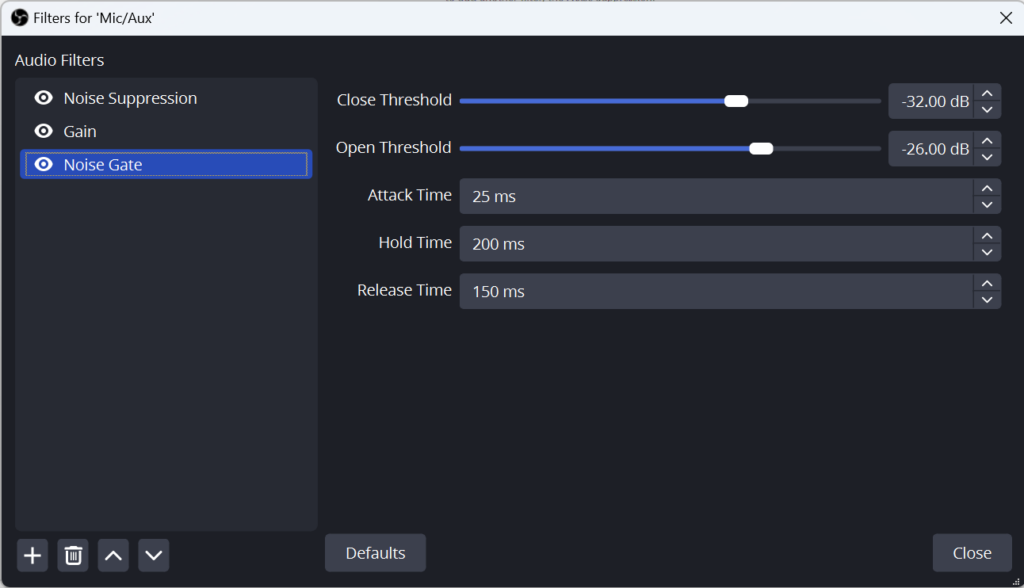
If the Noise Suppression isn’t working for you, you can manually adjust your input levels through a Noise Gate. A noise gate is what it sounds like: It “shuts the gate” on input noise that exceeds a certain decibel level, and opens it again when things quiet down. The Close Threshold is the setting at which your mic will stop transmitting audio, and the Open Threshold is the level at which it’ll resume. You can play with these in real time while you monitor the input, but if you are doing this by recording, you’ll have to let yourself know what you’re doing unless you get all meta and record the screen which displays your SLOBS console. Trippy! Attack, Hold, and Release indicate how quickly the gate shuts, how long it’ll hold after you stop talking before it starts to open, and how quickly it’ll open once the input detects relative silence, respectively. Since I have switched over to using the noise suppression exclusively, the settings in the noise gate image above are not suggested. Also, I believe it’s wise to use either the suppression or the gate, but not both.
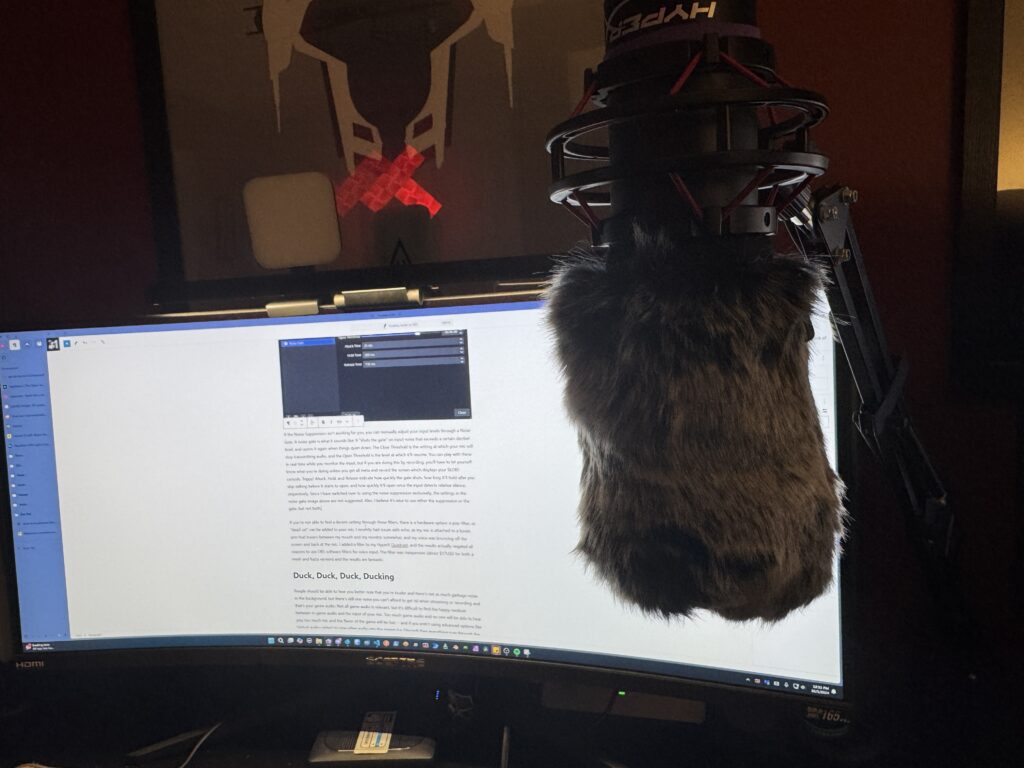
If you’re not able to find a decent setting through these filters, there is a hardware option: a pop-filter, or “dead cat” can be added to your mic. I recently had issues with echo, as my mic is attached to a boom arm that hovers between my mouth and my monitor somewhat, and my voice was bouncing off the screen and back at the mic. I added a filter to my HyperX Quadcast, and the results actually negated most reasons to use OBS software filters for voice input. The filter was inexpensive (about $17USD for both a mesh and fuzzy version) and the results are fantastic.
Duck, Duck, Duck, Ducking
People should be able to hear you better now that you’re louder and there’s not as much garbage noise in the background, but there’s still one noise you can’t afford to get rid when streaming or recording and that’s your game audio. Not all game audio is relevant, but it’s difficult to find the happy medium between in-game audio and the input of your mic. Too much game audio and no one will be able to hear you; too much mic and the flavor of the game will be lost — and if you aren’t using advanced options like virtual audio cables to pipe other audio into the stream (i.e. Discord) then everything runs through the desktop input and collides with your mic.
Ducking is the act of attenuating one audio source when another is activated, like turning down the game volume when you start speaking. Getting the right game-to-voice volume ratio is hard because sometimes different games have different volume levels, and sometimes this varies wildly within the game itself. Ducking can help, and we have a filter for that.
This time, we want to add a new audio filter called Compressor, and this time we want to add it to the Desktop Audio input.
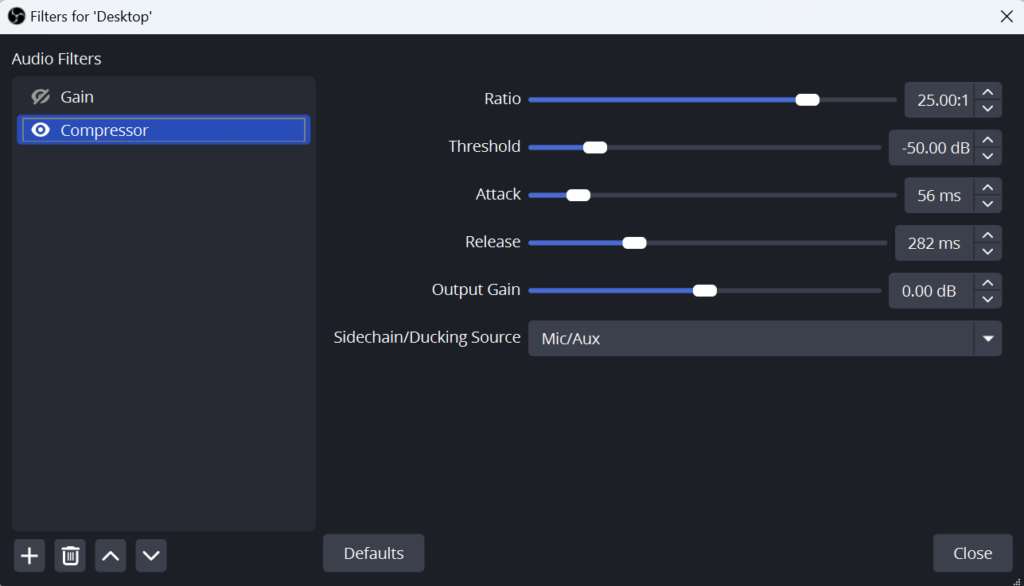
Compressor, as the name implies, compresses the audio of the input it’s applied to. The Ratio value indicates how much to compress the audio (here, the desktop audio), and the higher the number the more the audio will attenuate. Because we’ll be using this in tandem with another audio input, the ratio represents “units of desktop audio to units of other audio” where in this case the “other audio” is the mic input which we’ll specify in a second.
Like the noise gate on the mic, the Threshold, Attack, and Release values determine when the compression kicks in, how quickly it kicks in, and how quickly it’s allowed to return to normal after the mic source stops transmitting. There’s no “golden value” here, so you’ll have to play around with the settings. I like to have the mic be pretty aggressive so that it really stomps on the desktop volume quickly, and then to wait a few seconds before ramping back up, just in case I pause when speaking. The Output Gain should just be left as is.
The important setting here is the Sidechain/Ducking Source which should be set to your mic/aux input. This is what will trigger the desktop compression as the other part of the initial ratio value.
You can get a bead on the results of this filter by playing a game or YouTube video and watching the desktop meter in SLOBS hit somewhere in the yellow zone (which I learned is the “optimal zone” for good audio levels). When you start talking on the mic, the desktop meter should shrink back towards the lower end as the mic meter creeps towards the yellow of its own bar. The audio results will be most noticeable when you record a local video, which is strongly advised as a means of testing things out to make sure they are to your liking.
Recording: Multi-track Audio
Since I first wrote this post, OBS has added the ability to break out your audio inputs into different tracks when recording — this doesn’t apply to streaming. The setup for this is a bit more advanced, and my settings work for me but might not be the best for you, nor the only options available.
To start, you need to head back to the File > Settings menu and choose Output from the sidebar menu. You’ll need Output Mode to be “Advanced” for this and I’d advise you to look but don’t touch any other setting unless you know what you are doing: you could screw up your recording or streaming settings otherwise.
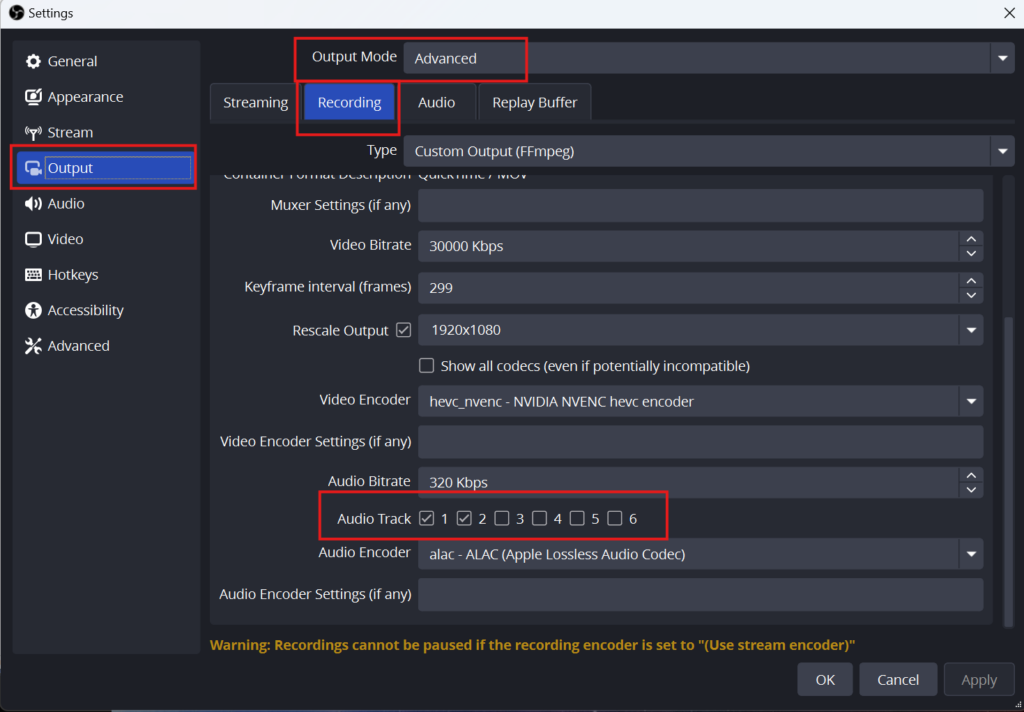
After switching to “Advanced”, select the “Recording” tab and scroll down to the very bottom. You should see a setting called Audio Track. Here, check off as many boxes as you have distinct audio inputs that you want to split. It’s important to differentiate between “audio source” and “places that generate sound”. For example, if you are listening to Discord, playing a game, and have a mic active, your mic will be one input, while Discord and game audio will be piped through a single input (again, unless you fancy and are using VAC).
Back on the main screen, click on the gears icon at the bottom of the Audio Mixer panel. You’ll see a bunch of checkboxes at the end of each audio input row. This is where you assign an audio input to a specific recorded audio track.
And of course, there’s some caveats here. There might be restrictions on the type of recorded file you can create if you want to use multi-track audio; I’m not sure if all popular formats support it. I use MOV as I learned it’s one of the best for post-production work, and it does support multi-track audio. Also, on Windows and because I choose MOV, I cannot use Windows Media Player to review my records; I have to open Resolve and work through there because Microsoft and Apple suck and Windows doesn’t come bundled with codecs for MOV files and audio, multi-track or no.
Annnnnd Scene
I am not an audio expert, so I managed to cobble this info together through various sources. With a little trial and effort, I was able to cut out a bunch of ancillary noise that I don’t think I even realized was being broadcast on the stream. I believe my voice will be louder now, and more importantly, I can leave my desktop input at full volume to be controlled by the levels from the mic.


1 Comment
Nimgimli
October 1, 2024 - 2:48 pmThanks for sharing this!
Comments are closed.