
 Scopique
- Mind Over Magic – Starting a New Game
- Mind Over Magic – First Steps
- Mind Over Magic – Our First Build
- Mind Over Magic – Research
- Mind Over Magic – Our First Student

Just to let you know, I re-rolled a new school. When I wrote the first post I had accepted a random assortment of NPCs, and didn’t follow my own advice even while writing the post. So I set up a new school with both Earth and Nature staff members, and chose Lightning as the third.
Harvesting Wood and Stone
With Nature and Earth, I’ve got affinity for cutting down trees and mining rocks. Since I’ll need a lot of these resources, I zoomed out, double clicked on a tree, and assigned all of those to be cut down. I did the same for the surface rocks that I could see. Upon doing so, all of the staff went out and started cutting down trees. While this is needed, I also need stone, so how to force staff to do this?
Priority
There’s two ways to manage priority. The first is at the individual NPC level, and the second is at the resource level.
NPC Level

NPC task priority can be found in the lower-right menu bar, second icon. If you’ve played Rimworld or alikes then this is old hat. Along the top we have a series of tasks that NPCs can do. Along the left we have our NPCs as well as settings for future additions to the school. Each task has an elemental icon which helps to remind us which attunement is best suited for that task and while the NPC icon doesn’t have a similar icon, the box at the intersection of row and column is colored darker when that NPC is well suited for a task.
By default everyone has the same priority for a task indicated by the “-“. Right clicking on a box will increase the NPC’s affinity for that task, and left clicking will decrease their affinity. In this case, I want Wesley to mine, and Fritz to chop. Hope and Nathanial — our resident ghost — can help out where they choose.
Resource level

On the lower-left we have Task Priority. We can select a priority value from the number line on the popup, and then click on a resource type to assign that priority.
This differs from NPC assignments in that any middle-of-the-road NPC assignments will prioritize gathering higher value resources over any other. It might also be that a priority of 5 will override individual NPC assignments regardless, but I don’t know if that’s the case. In any event, this is a way to get all hands on deck to focus on a specific resource over any other.
Our First Build – Arcane Secretary
You’ll want to star researching ASAP, so the first order of business is to construct an Arcane Secretary.

If you chose the easiest game type when starting as I did, you will have some research already unlocked. You can also enable or disable these when configuring your new game for the first time, but once you start, you cannot alter this decision. I chose to unlock these builds for expediency.

The Build menu is available from the lower-left menu bar. You’ll start off with some basic necessities like walls, floors, roofs, doors, basic lighting, basic sleeping, and basic teaching blueprints. If you started with some of the basic-advanced recipes unlocked, you’ll have those too, but the Arcane Secretary is always unlocked regardless. Hovering over any blueprint in the build menu will show you the amount of resources you need, and how many you have in parenthesis. It also tells you how much space you need to place the item, although the placement icon will turn red if you cannot place the item due to space constraints.

I chose to put the Secretary in the Mana Stone room. When placing the item, you can see that there are green tiles included: these need to be unobstructed and indicate where NPCs will stand when using that furniture. The popup also tells us how to rotate the item, place it, clear it, and how many resources we need/have.
Note that because of the perspective, it might be tempting to fill up space from front to back. Do not do this. NPCs need room to move around furniture, so if you place items at the back of the room and other items in front of that, NPCs will not be able to move around a room.
At this point, if all of your NPCs are still harvesting resources, you might need to head back to the NPC priorities panel to assign someone to Assemble.

Second Build – Staff Dorm
This is going to be pretty weak since out of the box, we don’t have a lot of furniture to work with.
In a non-relaxed game, normal beds are only for sleeping and special medical beds are needed to heal injured NPCs. In relaxed games, or where you’ve altered the difficulty settings, you can set any bed to heal injured NPCs. Wolfkin, however, can sleep anywhere without penalty so if you have one on staff, you can save some resources and not build them a bed.
Room Types
As mentioned, we can build some walls and something to cover it (floors or a roof), install furniture, and the NPCs will work with it as intended. If we want bonuses, however, we can build a room to suit according to the room types governed by keywords.

We can access the Book of Rooms through the first icon in the Views section of the lower-right menu strip.

Each room type is represented by a tab at the top. Each tab contains the things the room must have, things the room cannot have, and the benefits of crafting a room to fit. It’s important to remember that you do not choose a room and apply it to a construction project; simply building the room according to the specifications listed will adopt the assignment. This is convenient, kind of weird, and requires some back and forth between the Book of Rooms and your construction job, but it’s a unique approach.
To start, it might be tempting to aim for a Bedroom, but that’s a bit out of scope currently as it requires a specific type of bed which you won’t start with, and can only have so many beds per room. It also needs at least one window (also not unlocked to start) and a Luxury rating of at least 5. It’s certainly something to build towards, but to get things started, we’ll have to aim for the Austere Bedroom as it requires at least one cot and nothing else.
Adding Walls

AFAIK, there’s only one type of wall, although later we can decorate the room and change the look and feel. One wall requires 2 stone; one wall is basically a square construction that we will need to stack on top of each other to build up our height.

Initially, our topside palette only extends so far, limiting how wide we can make our building. Later (much later), you can research Foundation extensions which will allow you to expand horizontally. Building up is part of the game here; we’re going for more of a fantastical construct than a brutalist monolith.
Keywords and Governing Building Options
If we disregard the room types and keywords, we can make whatever we want in the space we’re allotted but in order to maximize our benefits we’re going to need to pay attention to how we build each room. Part of being able to do this will be determined by the play style we choose when starting the game.

Balanced provides a standard set of room keywords with probably logical assignment. A basic style (which I’ve chosen for this series) has a minimum number of keywords and doesn’t really throw too many curveballs, allowing us to build more standard designs to accommodate an array of room types. Styles on the right ramp up the different building techniques we would need to employ to satisfy a room type.
While you can build an “airy” or “chaotic” school with the basic setting (probably), you will need to pull out the creative stops to build anything if you choose airy or chaotic as your play style.

With the wall selected from the build menu, choose a location on the foundation to start. Click the left mouse button, release, and drag upward; you will add wall blocks as you go. It’s a good idea to create walls of five blocks or more in order to accommodate NPCs; any fewer and they might not get through the room, and any more and you’ll be spending resources you don’t need to spend at this point. Later, we’ll see some creative room decisions — and necessities — which play with this guideline. To finalize this wall, click the LMB again.
We’re also going to need to build a complimentary wall on the platform in order to create the room boundaries.
Strength and Support

MOM’s building system allows you to create some pretty fantastical structures, but not without cost. As you build, you need to be mindful of your current support. Walls and floors above the foundation need to be supported, and the amount of support a structure has is represented by the percent you see above. Walls, stacked on top of one another, have 100% support when built on a platform that is 100% supported. However, as you see above, when attempting to add a wall piece to the top of the planned wall, we get a message Not Supported. This means that we can’t just float this wall segment without anchoring it to something. This will become more important with subsequent floors, and later on we will unlock supports that can be placed in the middle of rooms to bolster our construction.
Adding a Door

Each room will require some way to enter and exit. Sometimes this is a staircase, and sometimes it’s a door.

Doors can be added during construction, or after construction, although it’s a good idea to build them before the walls are erected as corporeal NPCs will need the door if a completed wall prevents them from pathing to the other side.
Roofs

Every room needs a cover and the best cover is a roof. Roofs will prevent the room’s contents from taking damage during rain, and according to the tooltip, add +1 to a room’s Luxury rating.
To add a roof, select the starting point, LMB click, then drag to the ending point with another LMB click.

At this point, you can adjust the look of the roof. You can grab the directional icons to push and pull the direction the roof will lean, or where the start or end points are located.

The wonk slider adjusts the angles of the roof.

Altering either the design or the wonk of the roof changes the amount of resources that are needed to build the roof, and as far as I know, wonk is not a room keyword, at least not in the relaxed mode.

Now we have our very first room! It’s designated as a generic School Room meaning it has no purpose. If we click on the Book of Rooms, we can see everything we need to know about all of the rooms in our school.
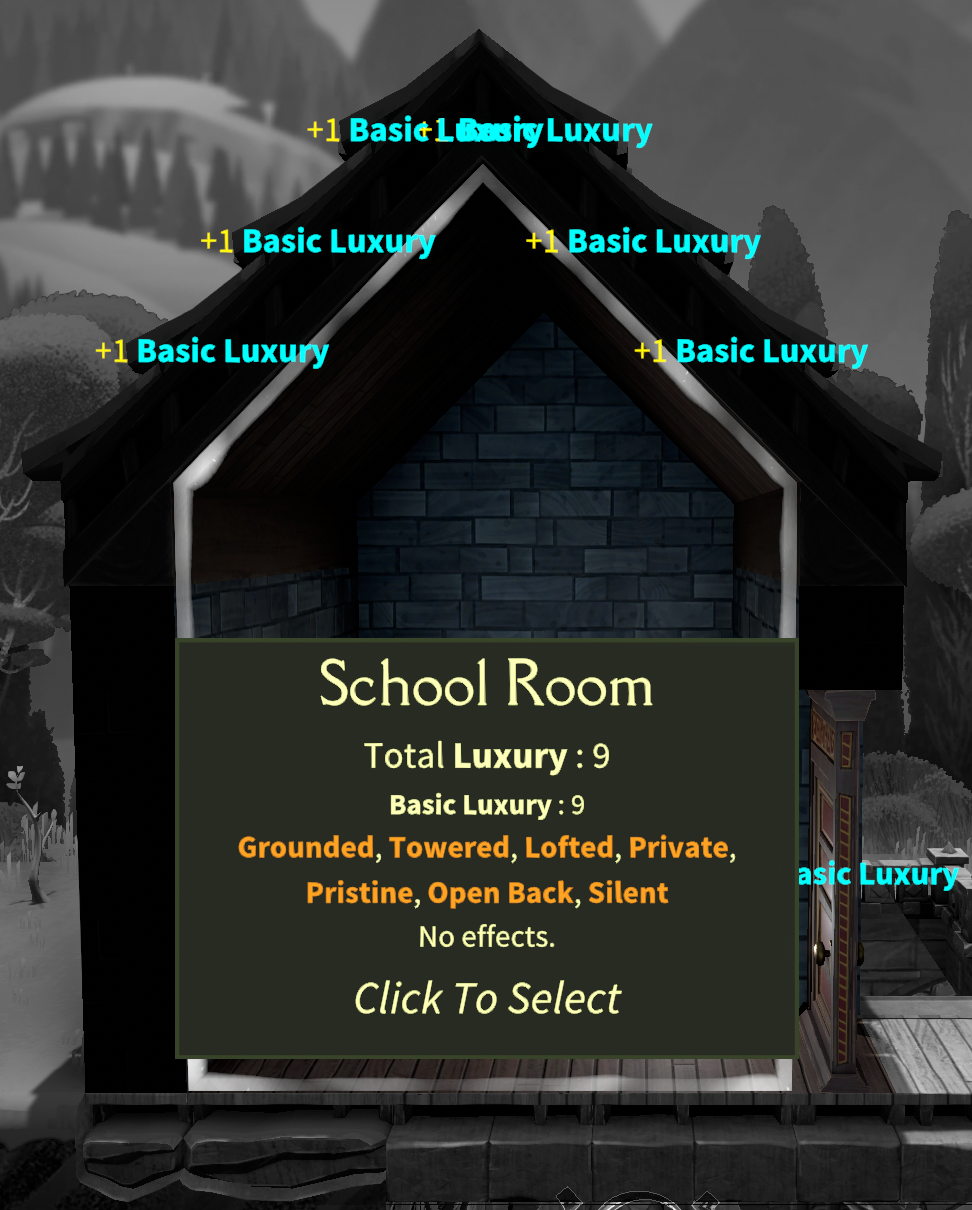
Here we have our Luxury rating which is made up of our roof and door choices, and the keywords that this room represents. Because it’s just a regular room, it has no additional effects.
Austere Bedroom
To make this an Austere Bedroom, all we have to do is add at least one cot.

In my game, I have a choice: I can add three cots for all three corporeal staff members, or — because one of the staff is a Wolfkin — I can add only two cots as Wolfkin can sleep anywhere. Since I made the room large enough for three cots, I’ll give Prof. Hope her own bed.

When placing items, they snap to a grid. We can use this to ensure that we’re not blocking NPC pathing.
Pathing Check

The second to last icon on the lower-right menu bar is the Pathing overlay. We can use this to show where NPCs are able to move. Anything in green is fully accessible and is what we want. Notice that the above-ground area on the left is not green; this is because the outer wall of the bedroom has no door and as a result NPCs will not be able to get there to gather resources. Sadly, Fritz is trapped over there, so I’ll need to add another door to the bedroom.
Note that this is something to keep in mind. Certain room types require there only be one door if any. As Since NPCs will always need to move between either side of the school building, all first floor rooms will probably need to have doors, with rooms on either side of the building having two: one for external access, and one for internal access. This makes the first floor a potentially poor choice for room styles which can only have one door.

Although we can’t see it in this screenshot, there are three cots built here. Adding just one granted this room the Austere Bedroom designation and as such any NPC who sleeps here gains 2.5 to their Conviction. Our Luxury rating increased as well by adding another door.


1 Comment
Tipa
February 17, 2025 - 12:57 pmReminds me a bit of the construction and use of workbenches and machines in Palworld…
Comments are closed.