Scopique
At this point we’ve freeze-framed an operation. A client has connected and has sent a message which has raised the server’s message event. We’ve translate the payload into an IMessage form, have matched it up to a handler that was loaded when the server was started, and we’re ready to take…some kind of action.
Anatomy of a Handler
interface IHandler {
    Name: string;
    Exec: Function;
}
Handlers currently have two properties: Name is a unique identifier for the handler, and Exec is a function that will be executed when the Name property of our IMessage object is matched to an instance of IHandler in the handler collection.
Sample Scenario: Adding an Item to a Shopping Cart
This is a totally contrived scenario because A) we probably wouldn’t be using web sockets for something like adding an item to a cart, and B) I don’t run an online storefront. For the sake of illustration, let’s roll with it.
Assuming we have a website or app which lists products for sale. An item is defined by a name, a description, optional size and color options, and a price. When a user clicks on the “Buy Now”, the front end would pick up the most relevant information — the internal item ID, the user’s choice of color and size, if applicable, and the quantity the user wants to buy — and send that to the server. We don’t need the extra info like name, description, or price because if and when we do need that, we can get it from the back end data store.
Get the Message
We’ve seen that our SocketServer instance has set up an event handler for the message event, passing the argument msg which we translate to a string. This is then passed on to a method HandleMessage defined within an instance of the WebMessageHandler class. As we’ve loaded our handlers from individual files when the server started, the next step is to match the Name property of the message to the Name property of one of the handlers.
import { WebSocket } from "ws";
import { IMessage } from "../Objects/IMessage";

// Redis
const client = require('../DataAccess/Redis/client');
const rom = require('redis-om');

// Shape of our Cart item
const cartItemRepo = new rom.Schema(`Cart`, {
    IID: {type:'string'},
    COL: {type:'string'},
    SIZ: {type:'string'},
    QTY: {type:'number'}
})


module.exports = {
    Name: 'AddToCart',
    Exec: async(ws:WebSocket, msg:IMessage) =>{
        // msg.Data will contain information about the item the user wants in the cart.
        // It will also carry data about the user session (ideally).
        try {
            const _itm = msg.Data;
            const _client = client.getClient();
            const cartItemRepository = new rom.Repository(cartItemRepo, _client);

            const _results = await cartItemRepository.save(_itm);

            console.log(_results);
        } catch (error) {
            console.log(error);
        }

    }
}
Here’s a sample handler I created that will accept the user’s item selection and save it in Redis using Redis-OM.
Handle It
// These are needed
const HandlerCollection = require('../Objects/HandlerCollection');

import { WebSocket } from "ws";
import { IMessage } from "../Objects/IMessage";


module.exports = {
    Name: [NAME_TO_MATCH_TO],
    Exec: async(ws:WebSocket, msg:IMessage) =>{ ... }
}
Each handler requires three imports: HandlerCollection, WebSocket and IMessage. The first allows us to get access to all connections currently registered with the server. The second is the specific connection which sent the message. The third enforces the shape of the message we are being sent.
Handlers export a specific form consisting of a Name and Exec property. The Name property is used to match with the Name property of the message. The Exec property holds a function which takes the sender’s web socket instance and the message. From then on, it’s up to the developer to decide how to deal with the information that the handler has been provided.
Adding to the Cart
In this example, we have imports for Redis and Redis-OM, followed by the Schema definition for the data we will be saving to Redis. As mentioned, the Schema should reflect the form of whatever we are receiving from the client, which is going to require some mandatory documentation. I’ve learned that if the message contains fields not in the Schema, the data will not save. I haven’t tested what happens if required Schema data is not found in the message.
The Exec function simply uses the Redis-OM method of saving the data to the data store.
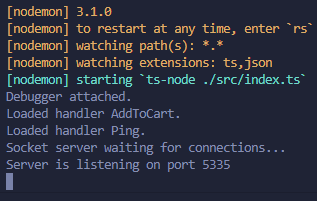
Testing
Starting the server, we see that we’ve loaded two handlers: “Ping” and “AddToCart”.
A Brief Sidebar: Session Management
I’ve made some updates to the code since posting it, which I guess is a downside of coding and blogging about it in parallel.
The site tracks connections by putting them into a collection. This will allow us to loop through and “broadcast” messages to all connected users, but more often it will allow us to pull a specific web socket that we want to target directly. In order to provide each item in the collection with a unique identifier, I have added a session UUID that is created when the user triggers the server’s connection web socket event. This session is then converted to a JSON Web Token (JWT) which we return to the connecting client. The client will then be on the hook to manage that token as it will be required for all further communications — eventually.
console.log(`Connect`)

// Unique Connection ID. This is our session ID.
const _uuid = uuidv4();

// Add this connection to the local storage
Connections.AddConnection(_uuid, ws);

// Generate the JWT, specific to the websocket connection
const _token = jwt.sign({ SID: _uuid}, '[SOME_SECRET_KEY_TO_ENCODE_THE_JWT]', {'expiresIn': '1d'});

// Send the connection notification message to the client
const _msg:IMessage = {
	Name: 'CONNECTED',
	Token: _token,
	Data: null
}
ws.send(JSON.stringify(_msg));
I’ve also re-worked the IMessage object, replacing the Description key with the Token key. Here, the server is generating the session ID and we are adding the web socket to the collection with the SSID as the key. We then generate our JWT, craft our message, and call ws.send() to push the message to the client.
Testing with Postman
For testing I’m using Postman with a web socket connection. When we make our initial connection, the client receives the following response:
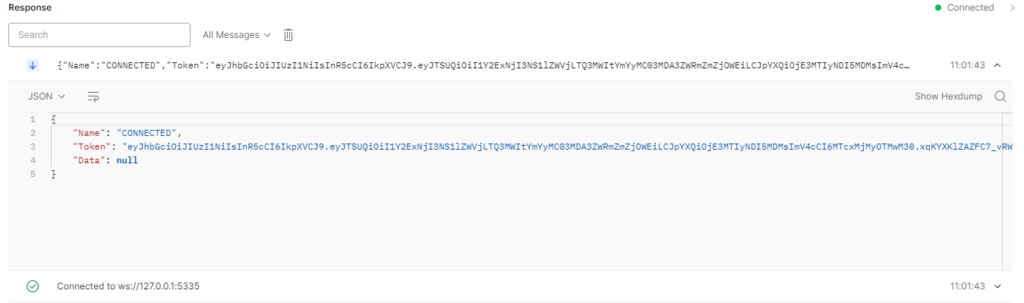
This is the shape of the IMessage object. The client-side web socket would have it’s own message event handler and when it receives a message with the Name of “CONNECTED”, it should take the value of Token and store it somewhere that makes sense for that application.
Now that we’re connected, we need to send our shop item to the server. In order to do this, we need to craft our message to conform to the IMessage specification:
{
    "Name": "AddToCart",
    "Token": "eyJhbGciOiJIUzI1NiIsInR5cCI6IkpXVCJ9.eyJTSUQiOiI1Y2ExNjI3NS1lZWVjLTQ3MWItYmYyMC03MDA3ZWRmZmZjOWEiLCJpYXQiOjE3MTIyNDI5MDMsImV4cCI6MTcxMjMyOTMwM30.xqKYXKlZAZFC7_vRWymsAWLLhiR5SEEwCs9C0xIhNw8",
    "Data": {
        "IID": "2c6886e8-2f52-4c83-b2f1-faefa1bf0205",
        "COL": "Black",
        "SIZ": null,
        "QTY": 1
    }
}
The only real curve-ball here is the value of Data. In IMessage the Data key is of type any which allows us to provide any shape for the value. In this case the value of Data is an object whose keys mirror the definition of the Schema we created in the “AddToCart” message handler.
When the data reaches the handler, the value of Data will be applied to the Schema form and saved to Redis.
I’ve opted to allow Redis to provide the key differentiator but we might opt to decode the token and use the SSID, for example. The record data is stored as JSON according to the Schema form.
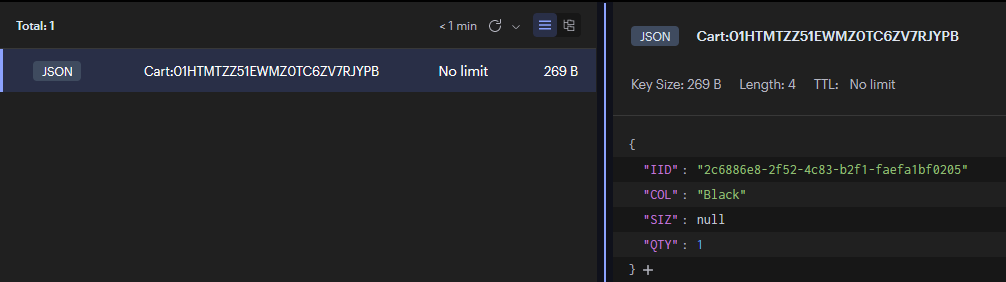
We can see what Redis returned after the insert operation:
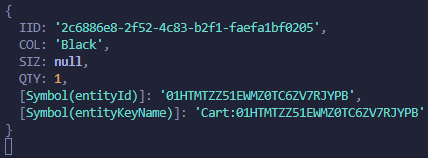
We have the Schema form, but we also have the Redis generated “entity ID symbol” and the resulting key that was applied to this record.