Scopique
Redis is a NoSQL database, meaning that it stores data in flat silos. This is in contrast to a “relational database” which uses fields, tables, and queries to maintain data integrity while allowing data to be grouped, shaped, and delivered to a client. The upside of relational databases is that any data structure can be modeled by combining the parts. The upside of a NoSQL database is that it’s fast and flexible. It’s these upsides that make NoSQL databases good for non-persistent data; since Redis stores its data in system memory (with an option to flush to disk), it’s fast, flexible, and is great for tasks like session tracking, shopping carts, and chat messages, among other caching duties.
I’m not going to go into the specifics of installing Redis, but like every other technology I’m using for this project, it can be run in a Docker container. If you’re looking to test-drive Redis I’d suggest the “Redis Stack” image: docker run -d --name redis-stack-server -p 6379:6379 redis/redis-stack-server:latest. This contains both the server and a convenient user interface for viewing the contents to the server, executing commands, and getting help.
I’m using the Redis library in the project, as well as the “object mapper” Redis-OM
Redis-OM
I suppose talking about Redis-OM requires that you know how Redis normally stores data, but know that by using this library, we can store objects as JSON strings in Redis. This is a native feature of the database, but using Redis-OM makes things easier than having to use Redis’ native JSON support syntax.
Redis client.ts
In order to connect to our Redis instance, we need to set up our client with options and make it available to the intended operations.
const redis = require("redis");

const client = redis.createClient({
  legacyMode: true,
  url: process.env.REDIS_SERVER,
  socket: {
    connectTimeout: 10000,
  },
});


// This is a catch all basic error handler.
client.on("error", (error: Error) => console.log(error));

while (!client.isOpen) {
  try {
    client.connect();
  } catch (error) {
    console.log(error);
  }

}

module.exports = {
  getClient: () => client,
};
My options are a bit anemic, but the basic gist is that we need to call redis.createClient and provide it with the URL to the Redis instance we want to use. If you’re running locally, then the URL would be in the form redis://127.0.0.1:6379. Note that if you are running Redis Stack, the UI defaults to port 8001, but to connect to the server from code the default port is 6379. We return the instance of client to the caller, and this how we’ll be interfacing with Redis.
Anatomy of an Object Map
The point of object mapping is to take whatever we expect to receive from a data store operation (database) and assign it to an object whose form is understood by the consumer (in this case, the server). In doing to, the code itself will assign the data to the mapped object without us having to create instances of the object and manually loop through the fields to assign them to the object’s properties.
Redis-OM requires that we define our data shape as a Schema. For example, if we wanted to save a basic “user” record, our schema might look like this:
const rom = require('redis-om');
const userRepo = new rom.Schema('User', {
   ID: {type:'number'},
   FNAME: {type: 'string'},
   LNAME: {type: 'string'},
   EMAIL: {type: 'string'}
})
This format should be familiar to TS users as it’s basically an interface. The value of 'User' defines part of the key that Redis will use to identify this entry in the database. The fields will be stored as JSON in the record.
To do the saving, we need to create a new repository, and then call save.
// DATA needs to conform to the shape of the Schema, so it's helpful to
// know what you're receiving, and shape the Schema to match
const DATA = {ID: 1, FNAME: "Homer", LNAME: "Simpson", EMAIL:"H.SIMPSON@SPRINGFIELDNUKES.COM" }

const _client = client.getClient();   // From the Redis client.ts
const _userRepo = new rom.Repository(userRepo, _client);
const _results = await _userRepo.save('CUSTOM_ID', DATA);
The value 'CUSTOM_ID' is useful if you want to include some identifier as part of the record key. If we leave it blank, Redis will generate a GUID (which we can receive and deal with) but I find it easier to use a more internally meaningful identifier.
If we look at Redis Stack’s UI, we will see this:
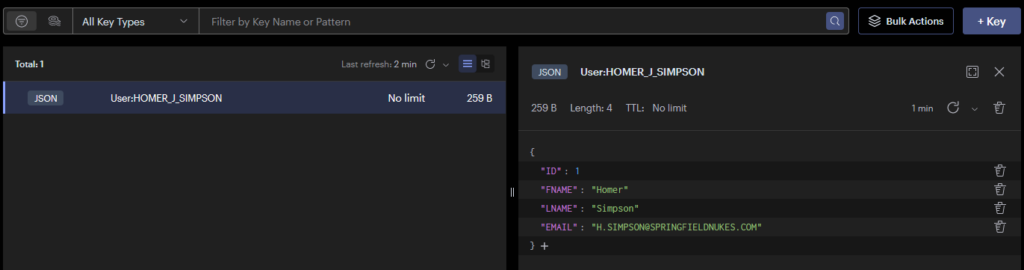
I have replaced CUSTOM_ID with HOMER_J_SIMPSON which, when combined with the Schema key part User, forms the key for this specific record.
Querying Redis is an art unto itself. If we know our key we can get it directly by querying for it, but if we don’t know the variable portions that we want, we can still craft a GET that can pull by the known parts of the key. Unfortunately, this is a topic that’s too large for this post.
Alternatives
Of course, we can also use regular Redis without Redis-OM, and the Redis library for Node works very well, although trying to perform anything more complex than a simple GET can become an exercise in frustration (though not impossible). If you still want to use Redis-OM but don’t care for storing data as JSON, there is an option to store the data as a HASH which might be beneficial in some cases.
Advanced Options
I’m not going to explain everything about Redis or Redis-OM, but know that as a NoSQL database that’s especially suited to caching data, you can set values such as time to live which will cause the record to be removed after a certain amount of time. If you wanted to expire sessions after a certain period of inactivity, for example, it’s relatively simple to set that up so you don’t need to manually clean out older records.