Scopique
My new PC came with Windows 11 Pro, and I know I’m supposed to hate it because “change” and all that, but I don’t really; I’m old, but not “why can’t they just leave things alone” old. In fact, I accidentally found an interesting piece of software included in Windows 11, called Power Automate.
Automation is one of those buzzwords that I feel I should be leaning into, but when I try and find a way to fit it into my computing habits I come up short. I don’t know that I do any singular task the same way over and over enough to convert it to a push-button script, but maybe I’ve never really thought about it because I didn’t have a handy way to actually do the automation. Power Automate isn’t a new concept, of course, and there are a lot of third-party options out there, but since this app is already in front of me, and because I’ve been having some issues with my normal screenshot routine, I decided to try to make an auto-screenshot task.
Power Automate uses a visual scripting drag-and-drop system that allows users to set up step-by-step operations. In truth, this is packaged as a business tool and includes steps for working with Excel, Word, and Outlook, but there’s a lot of options beyond that, like workstation functions, database function, working with the clipboard, PDF documents, and even browser automation. Now we can all create click-farms for online points!
I am terrible about remembering to take screenshots of my games, especially the “action shots” because…you know…I’m too busy focusing on the game to remember to press a key combo that takes the screenshot. I remember a friend talking about how she had an app which took a screenshot every few seconds, so I thought that recreating such a tool could be a worthy attempt. Turns out that it was pretty simple to do.
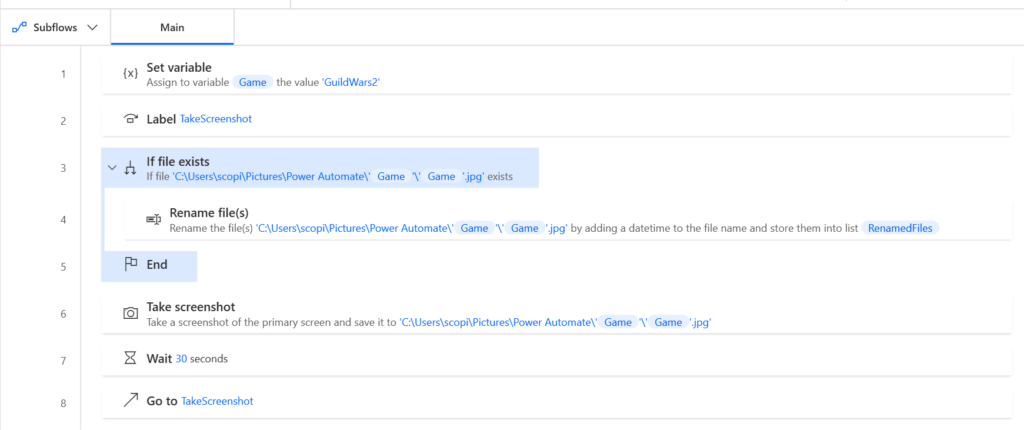
First, I set a variable called “GAME” which is set to the name of the game I am working with. Because the screenshots need to have a file name, and because I use that value a few times, this was the easiest way to do it. This means that I need to make one flow for each game I want to work with, but I’m hoping to dive deeper and get the image file name to match the name of the active window so I can use it for any app, at any time.
Next, I set a label. This allows the script to loop back to start the process over again.
Now we get into the core of the script. If there’s a file in the specified location with the name ‘[GAME_VARIABLE].jpg’ then it needs to be renamed with a ‘month/day/year hours:seconds’ suffix. This ensures that the next screenshot doesn’t overwrite what you want to store.
Then we take a screenshot. It’s a drag-and-drop step so it’s easy to add. The question is: how to determined what to screenshot? As I usually play on a specific monitor, I set the script to take a picture of “the primary monitor”, but it can look for a specific process or a specific window name. Sadly, I didn’t have a 100% success rate with window names when working with games, and I don’t know why. Selecting the primary screen works perfectly though.
After the screenshot has been taken, the script will wait 30 seconds. This is a big question-mark, though: how often is often enough, but not too often? One screen every 30 seconds is 2 screens a minute, 120 screens an hour, and so on. That would mean that every game would need a post-process where I go through all of the screens and weed out the “downtime” shots, keeping only those of worth. Not an onerous task, I suppose, but cleanup would be an absolute must.